Monday, February 14, 2022

VCM2 Interface VS SVCI J2534 Interface


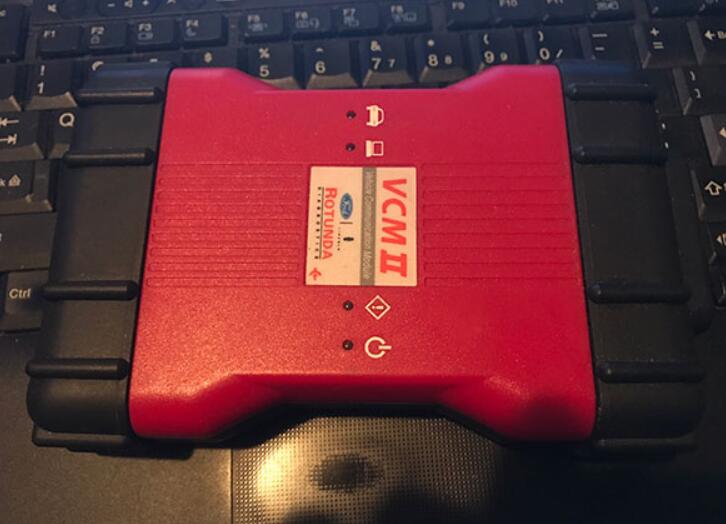
Question: Can someone please recommend the best place to buy the most reliable clone VCM2? I would only use this for diagnostics as I have the OEM device to flash. Or can someone suggest an inexpensive place where I might get an OEM device? What I would really like to get my hands on is a VCM2 that can run on Windows 10 with a native installation of IDS V124, that supports ALL F-series diesel trucks up to 2019+ and does online flashing / programming.

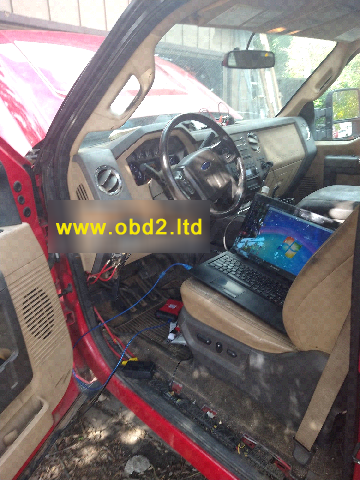
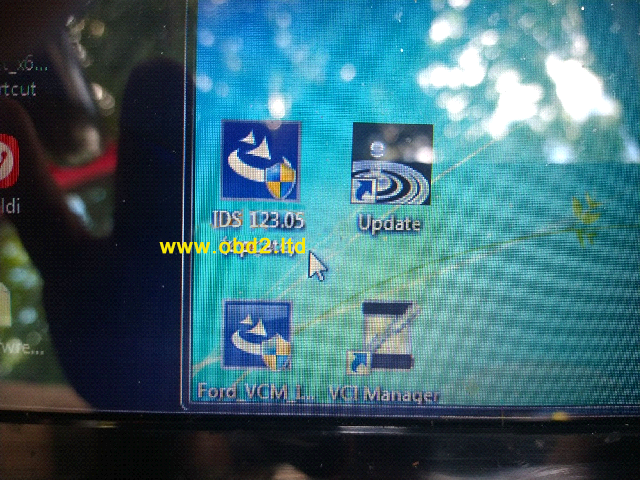
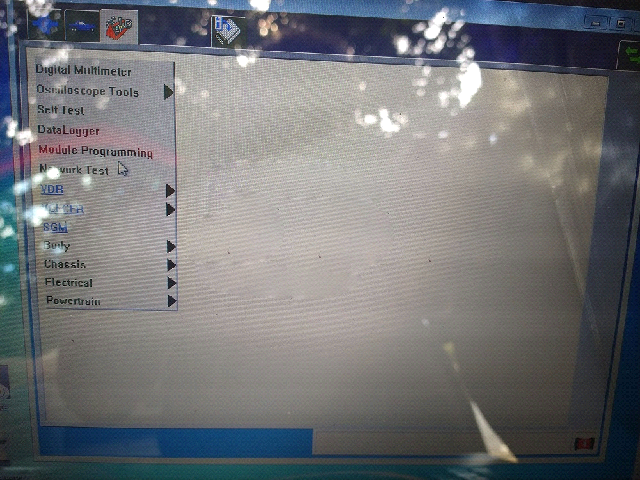
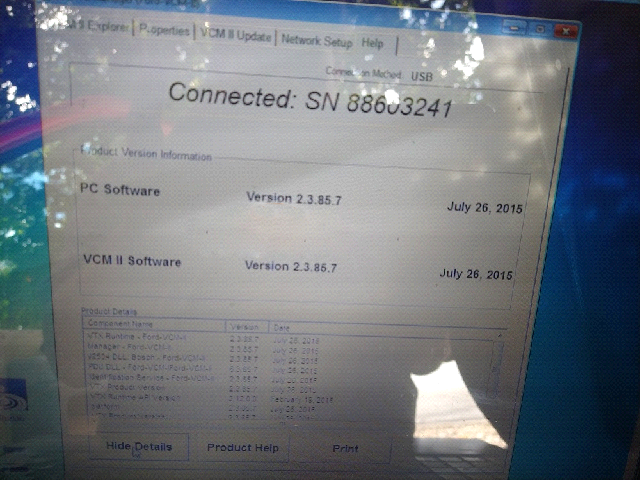
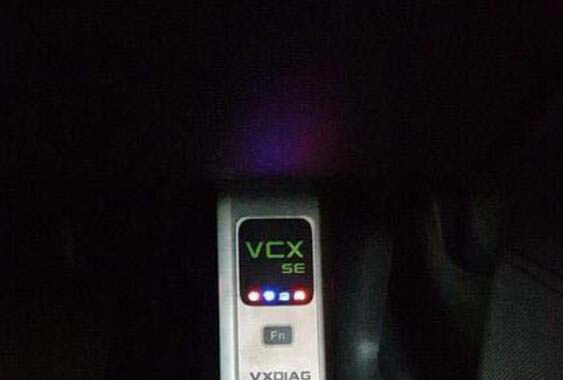
Experiences / feedback on sharing: I will give you two options that I use in the shop: VCM2 interface: there are several, with or without WiFi, different quality levels, processes, etc. Me have some of them on different software versions and all of them work well with IDS, diagnostics and programming. I recommend using WiFi VCM2 only for diagnosis, always VCM2 with USB cable for programming.

VCM2-Interface-VS-SVCI-J2534-Interface-1

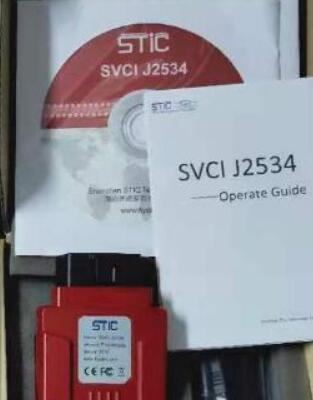
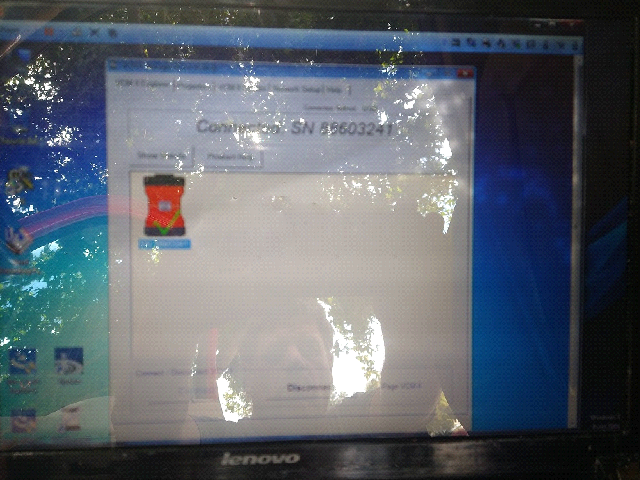
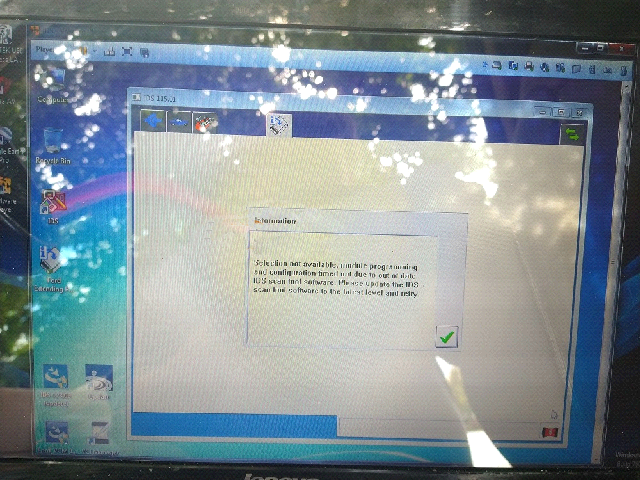
SVCI J2534 Interface: It’s a great tool that overcomes the VCM2 interface. You can always use it with the latest IDS software version, provide the license for the program yourself (see flyobd.com website for software installation and instructions) and make your life really easier as it uses no virtual machine and date can roll back. Works great with diagnostics and programming. Can also be used as a J2534 pass-thru interface with other software. Only works via USB cable.

VCM2-Interface-VS-SVCI-J2534-Interface-2


How to Solve Ford VCM2 Module Programming & Configuration Timed Out Error


This article comes with an eastern European customer who bought Ford VCM 2 Diagnostic Tool that have this Module Programming & Configuration Timed Out Error.

Firstly, let’s check what he is saying:

Hi, Enclosed are a set of 7 pics, and Ill start with explaining what it is that I need to do…   The Original PCM is no longer available to us and so a manual programming of the PCM MUST be COMPLETED… Keys must also be set for truck to operate… All Input values are known and ready to be uploaded to the PCM… The Exact process of programming may or may not be correct So Correct any Flaud Step that maybe the reason that this is not working correctly

IDS
The VCM2 is Found and Connected and Handshaking is establishe and Varrified by Acknowledgment through IDS Software…  Within the IDS GUI, after the establishing and the successful connection with IDS, and Downloading the PCM’s Internal saved data… Next Selecting the “Toolbox Icon” (Left side top 3rd Icon) I select “Manual Programming” and hit the “Check”, After a couple seconds an Error occurs:

————————————————————
Selection NOT AVAILABLE, module programming
and configuration timed out due to out of date

IDS scan tool software.  Please update the IDS
scan tool software to the latest level and retry.
————————————————————
(See provided pic for actual error)

What his attempts to solve:

I did attempt to download and install the Genuine Ford Update at www.motorsportservice.com but update Fails with “Wrong Version Found” This Update will update Ver 123.01 to 123.05 only (there is a Pic included on the desktop of the update) This Ver is 115.01

What I need to know is Can this IDS UPDATE, or Is there a work-a-round or method of programming a PCM With this Hardware/Software Comb as it sits out of the box…
Please Advise…  Thank You in Advanced, your help is much needed and appreciated

Check provided pics to find actual error:

How-to-Solve-Ford-VCM2-Module-Programming-&-Configuration-Timed-Out-Error-1
How-to-Solve-Ford-VCM2-Module-Programming-&-Configuration-Timed-Out-Error-2
How-to-Solve-Ford-VCM2-Module-Programming-&-Configuration-Timed-Out-Error-3
How-to-Solve-Ford-VCM2-Module-Programming-&-Configuration-Timed-Out-Error-4
How-to-Solve-Ford-VCM2-Module-Programming-&-Configuration-Timed-Out-Error-5
How-to-Solve-Ford-VCM2-Module-Programming-&-Configuration-Timed-Out-Error-6
How-to-Solve-Ford-VCM2-Module-Programming-&-Configuration-Timed-Out-Error-7

What suggestions given by our tech engineers:

This error occurred because the software used here is not the latest version. So customers can try if they can get access to the original IDS 123 software with license. All problems are gonna be solved! The functions can be realized easily through online coding. Any further problems, contact us directly.

Friday, January 21, 2022

How to Activate and Update XTOOL A80 Pro (H6 Pro)

This post will share the guide to register (activate) and update XTOOL A80 Pro (H6 Pro) diagnostic tool for the users who use this XTOOL tablet at the first time.

Main operation guide:
The device used below is XTOOL H6 Pro, but the guide also applies to A80 Pro.
First, turn on the XTOOL tablet.
When you receive the device, you will have some charge in the actual tablet, you can connect it to the main power.
You’ve got to have your WIFI network ready and as you see that little Ferrari rolls up then you know you’re in business.

How-to-Activate-and-Update-XTOOL-A80-Pro-1

Then go to hit “START TO ACTIVATE”.

How-to-Activate-and-Update-XTOOL-A80-Pro-2
If it says “The current network is not connected, click the “OK” button to connect to the WIFI network”, just click “OK” to continue.

How-to-Activate-and-Update-XTOOL-A80-Pro-3

Then it will show what WIFI networks are available, just choose one network to set up for device upgrade.

How-to-Activate-and-Update-XTOOL-A80-Pro-4

After that, hit “START TO ACTIVATE” again.

Put your company name &email address, and click “OK”.

How-to-Activate-and-Update-XTOOL-A80-Pro-5

When the device has been activated (registered), it will show “succeed”.

How-to-Activate-and-Update-XTOOL-A80-Pro-6

Next, go to the main screen by hitting the little van button.

It’s a brand new device and need to update all applications and download all software.

Click “App Update” and then click “Install” when it prompts you to install an update to the existing application.

How-to-Activate-and-Update-XTOOL-A80-Pro-7
How-to-Activate-and-Update-XTOOL-A80-Pro-8

Once the App is installed, click “DONE” or “OPEN” is ok.

How-to-Activate-and-Update-XTOOL-A80-Pro-9

When click “OPEN”, you can enter the main menu again, it’s the latest version, so click “Update”

Note: The wifi network should be connected during the update process.

It will make the device fully up- to- date and usable. It’s very important you do this when you buy the device because it won’t have all latest software. If it’s a European version, it will download all EU software, just click “Update all” to download and install all software.

How-to-Activate-and-Update-XTOOL-A80-Pro-10

All software is up to date.
How-to-Activate-and-Update-XTOOL-A80-Pro-11

If come back to the main menu and go into the update again, it will connect again to the server which is good practice to do because there’s so many frequent updates and sometimes when you’re updating another update will just come out.

When it’s your first time to do this, the full update would take about 20 minutes.

After the update is completed, return to the main menu, and go to “Diagnosis” function, then you can see all menus have already got.

How-to-Activate-and-Update-XTOOL-A80-Pro-12

That’s whole process to activate and update the XTOOL A80 Pro tablet.

Enjoy!

VXDIAG VCX SE JLR Not Connected to VCI Solution


Problem:

I had a problem connecting vxdiag vcx se se jlr doip with Pathfinder and vehicle. vx manager didn’t detect the vcx se unit. Tried installing JLR VCI Manager driver,  nothing happened.

error “Not connected to VCI”, image attached:

VXDIAG-VCX-SE-JLR-Not-Connected-to-VCI-Solution-1
VXDIAG-VCX-SE-JLR-Not-Connected-to-VCI-Solution-2
VXDIAG-VCX-SE-JLR-Not-Connected-to-VCI-Solution-3

Solution:

Try to connect vcx se jlr with PC via WiFi.

Search  DoIP VCI wifi and pair with password: 12345678

VXDIAG-VCX-SE-JLR-Not-Connected-to-VCI-Solution-4
Run VX Manager again.

If vx manager still cannot detect device, disconnect and power off vcx se for 3 minutes, then try again.

Wednesday, December 15, 2021

How to open Online Programming Function for Launch X431 PAD V,PAD VII , PAD III


Launch X431 PAD V , Pad VII, PAD III all support online programming function , but some equipment was shield by original factory , you can open the function as bellowing steps :

Setting online programming functions operations :
Enter into other – equipment-File management – cnlaunch folder – X431PADV – assets folder find out the StdCfg.ini file

How-to-open-Porsche-Piwis-3-Remote-access-teamviewer-1
How-to-open-Porsche-Piwis-3-Remote-access-teamviewer-2
How-to-open-Porsche-Piwis-3-Remote-access-teamviewer-4
Open the StdCfg.ini with text editor ,Click the edit button on the upper right, make the file in edit state, Find out OnlineFlash and Flash ,the default value is 0 , means not support online programming , Click on the corresponding field and change the value to 1 , click save . Let the value to 1 like the bellowing picture :

How-to-open-Porsche-Piwis-3-Remote-access-teamviewer-3

How-to-open-Porsche-Piwis-3-Remote-access-teamviewer-5
Then , the diagnostic software of your machine can support online programming function .

Be attention : America north countries not support online programming recently , the other area can do it like the above steps , and the online programming menu will not display on front page,you should enter into the diagnostic software then can find the Corresponding menu .

How to Update XENTRY Diagnosis VCI Firmware


After an update to the XENTRY Diagnosis Pad 2, you may then need to update the firmware for the Xentry diagnosis VCI.
You can also see this in the VCI Manager on the overview page:

How-to-Update-XENTRY-Diagnosis-VCI-Firmware-1

Click in the “Update” menu item in the VCI Manager and then on the “Start update” button.

How-to-Update-XENTRY-Diagnosis-VCI-Firmware-2

When executing the update, please ensure that the USB connection between XENTRY Diagnosis Pad and VCI is not
interrupted.
Once the update has completed, you can then continue to work with XENTRY Diagnosis Kit 4 as usual.

How-to-Update-XENTRY-Diagnosis-VCI-Firmware-3


Monday, November 22, 2021

How to install the Xtuner T1 on your laptop


WIFI XTUNER T1 heavy duty truck diagnostic tool supports more than 22 language and multi brand trucks, besides basic function such as Read ECU Info, Read DTCs, Erase DTCs, Clear learning value, Data Stream, Actuations, Read freeze frame data etc, Xtuner T1 supports  resetting, coding and programming as well.

XTUNER T1 Heavy Duty Truck Diagnostic Tool Overview:
● Extensive vehicle coverage for heavy-duty trucks.
● Complete function including DTC, DTC freeze Info, Live data, Actuation test and Special function.
● Support standard protocol J1939, J1708 and J1587.
● Communication: USB or WIFI connection for the VCI.
● XTUNER T1 Update: One years free for IDUTEX product hardware replacement and lifetime maintenance. Software is free updating within 1 year, from the date of online automatically updating.
● Supply OBDII and other 10 connector.
● With brand-new design, the hardware features in stability and anti-interference.
● The built-in overvoltage protection module is able to protect scanner and vehicle against accidental damage during checking.
● Work stably and smoothly in high and low temperature environment..
● Operation System:  Windows XP, Windows 7, Windows 8, Windows 10, which allows for more stable performance, better compatibility and expandability.

What Can XTUNER T1 Do?

Basic Function: Read ECU Info, Read DTCs, Erase DTCs, Clear learning value, Data Stream, Actuations, Read freeze frame data.

Resetting: Basic Reset, Oil change, Cylinder shut off test,Cylinder compression test,Cylinder balancing test, EGR Solenoid Test,EGR Pulse Ratio Test,DPF Manual Forced, DPF Normal Regeneration.

Coding: Control unit adaptations, Injector Codes, Read/Write VIN,Road speed limit optional vehicle speed set.

Programming:  Level calibration, Idle speed learning, Idle speed Adjustment, Camshaft timing control learning, etc.
XTUNER T1 System Coverage

Engine system, Body syetem, SRS system, ABS(anti-lock brake system),Instrument System, Transmission system, Brake control system, Unit pump system, Common Rail System, Electronical control system, Natural gas system, Tail gas after-treatment system, etc.
XTUNER T1 Vehicle Coverage

Diesel: For ASTRA, For BENZ, For BREMACH, For CATERPILLAR, For DAF, For DETROIT, For ERF, For FORD, For FOTON, For FREIGHTLINER, For FUSO, For HINO, For HYUNDAI, For INTERNATIONAL, For ISUZU, For IVECO, For KENWORTH, For KIA, For GM, For MACK, For MAN, For MaxxForce, For NAVISTAR, For RENAULT, For SCANIA, For TOYOTA, For UD, For VOLVO, ect.

Electronic Control System: For ALLISON, For BENDIX, For BOSCH, For CUMMINS, For WABCO.

Standard OBD: Diesel OBD.

How To Install & Use XTUNER T1 Scanner