Showing posts with label wiTech MicroPod 2 Scanner. Show all posts

Monday, June 15, 2020

Unable to access wiTECH 2.0 when DealerCONNECT site is unavailable

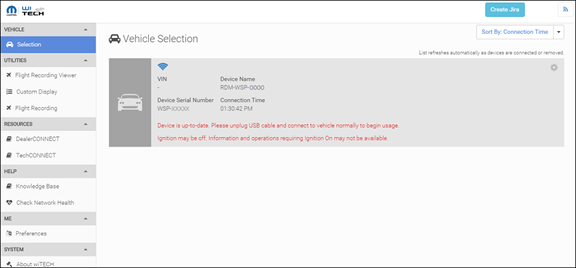
At any time DealerCONNECT site is unavailable this affects the wiTECH 2.0 system. Detailed below are a few behaviors that you might encounter while attempting to use Chrysler wiTech MicroPod 2, but unable to do so, due to DealerCONNECT site or services being unavailable.
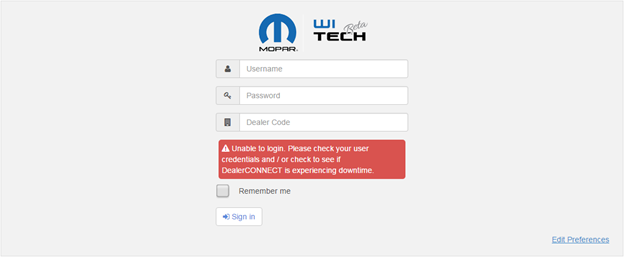
1. Attempting to login to wiTECH 2.0 site, and correct password is entered, but receive the message “Unable to login. Please check your user credentials and/or check to see if DealerCONNECT is experiencing downtime.”
Unable-to-access-wiTECH-2.0-when-DealerCONNECT-site-is-unavailable-1
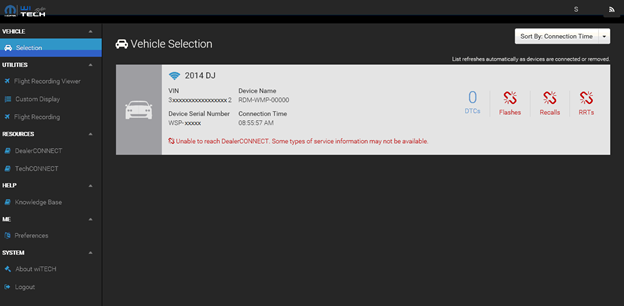
2. Establishing connection to a vehicle but receive the message “Unable to reach DealerCONNECT. Some type of service information may not be available.”
Unable-to-access-wiTECH-2.0-when-DealerCONNECT-site-is-unavailable-2
If you are seeing the messages above, please check DealerCONNECT site status at https://sitestatus.dealerconnect.com/ before calling the wiTECH Helpdesk.

Steps to download and install the microPOD Setup Utility

IMPORTANT: Once the microPOD is configured using the microPOD Setup Utility, all the microPOD Wireless Settings will be deleted. You will be required to follow the instructions from the KB link titled “How to configure a Wireless Profile on a Micropod II“.
To download the application, please login to DealerCONNECT > Service > wiTECH Information > microPod Setup Utility
Step 1
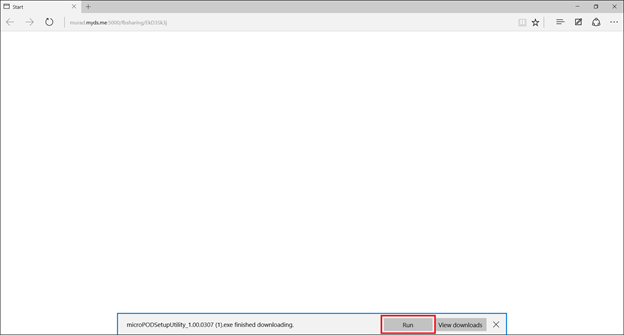
Click on “Run” to begin the downloading process of microPOD Setup Utility.
Steps-to-download-and-install-the-microPOD-Setup-Utility-1
Step 2
The install wizard will appear to install the wiTECH Driver x64 onto your computer if your PC has not been installed with wiTECH 1.0 application.
If the PC has been installed with wiTECH 1.0 App, you will not see the screen below and proceed to Step 6. Otherwise, click “Next” to proceed.
Steps-to-download-and-install-the-microPOD-Setup-Utility-2
Step 3
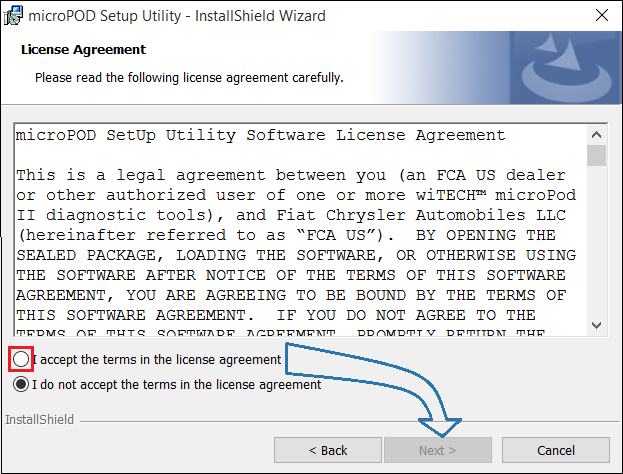
Read the License Agreement carefully, and accept the terms in the license agreement. Then, click “Next” to continue.
Steps-to-download-and-install-the-microPOD-Setup-Utility-3
Step 4
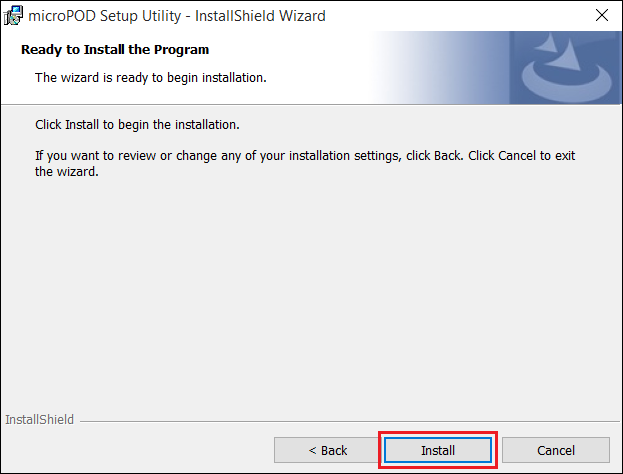
You are now ready to start the actual installation of the driver. You now need to click on “Install” for it to start.
Steps-to-download-and-install-the-microPOD-Setup-Utility-4
Step 5
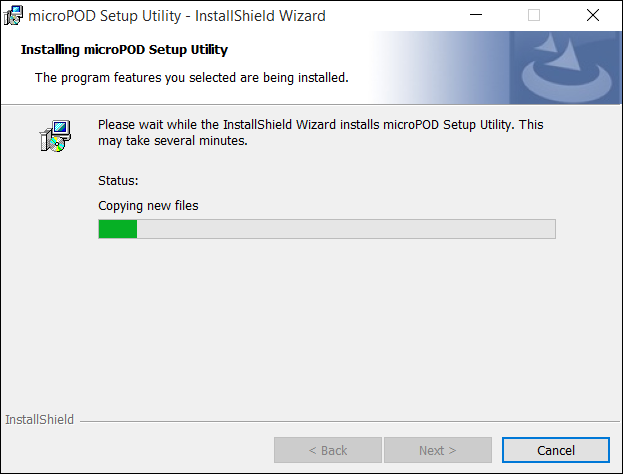
This will now install the wiTECH Driver x64. Once complete, the program will automatically proceed to the next step.
Steps-to-download-and-install-the-microPOD-Setup-Utility-5
Step 6
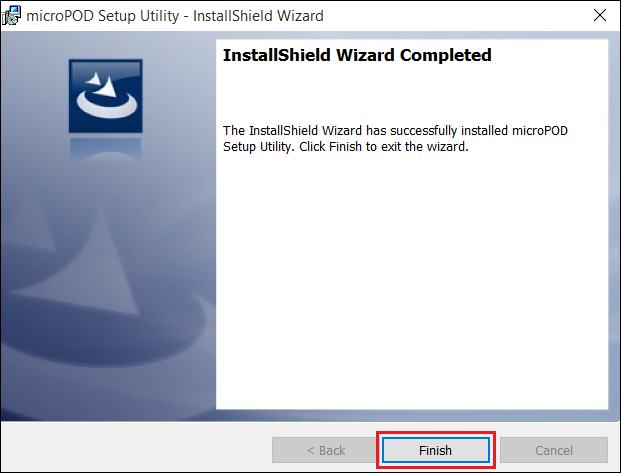
Once the installation has completed, click “Finish”. Proceed to the following section, “Using the microPOD Setup Utility”.
Steps-to-download-and-install-the-microPOD-Setup-Utility-6
Using the microPOD Setup Utility
NOTE: Please make sure that your computer is connected to the internet and the Chrysler diagnostic tool microPOD is connected to the computer via USB before starting this process. This application will help you configure your microPOD for wiTECH 2.0.
Step 1
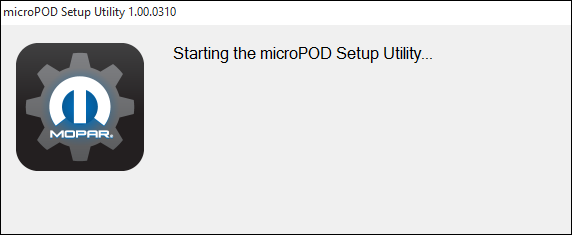
Start microPOD Setup Utility by clicking the icon on the desktop:
Steps-to-download-and-install-the-microPOD-Setup-Utility-7
If the microPOD Setup Utility that is installed is out of date, you will be forced to update to the newer version of the application.
Step 2
Please make sure your microPOD is connected to the PC via USB.
Steps-to-download-and-install-the-microPOD-Setup-Utility-8
Step 2a
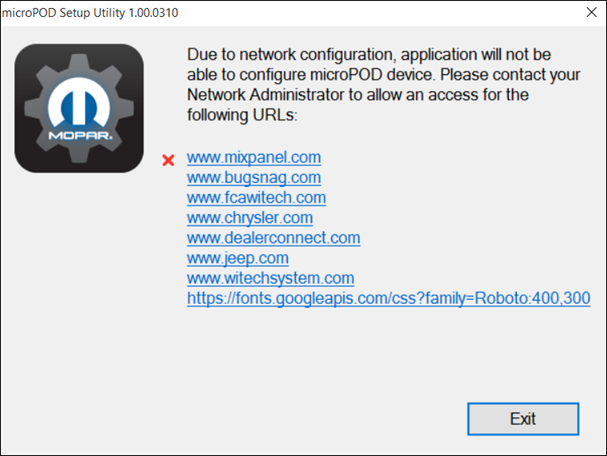
If you see the following screen you may not be connected to the internet, or have a firewall that blocks 1 or more of these websites.
Steps-to-download-and-install-the-microPOD-Setup-Utility-9
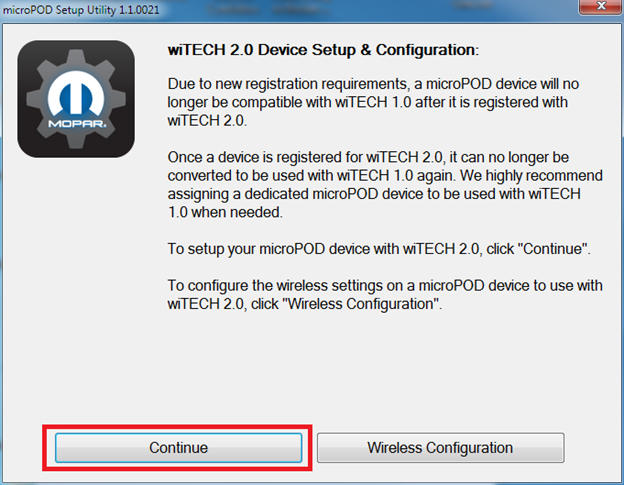
Select “Continue” on the next screen for wiTECH 2.0 Device Setup and Configuration.
Steps-to-download-and-install-the-microPOD-Setup-Utility-10
NOTE: If you only want to configure the wireless setting on a microPod device to use with wiTECH 2.0, click “Wireless Configuration” and follow instructions.
Steps-to-download-and-install-the-microPOD-Setup-Utility-11
Select “Continue” on the next screen to begin attempting to connect to the microPOD device.
Step 3
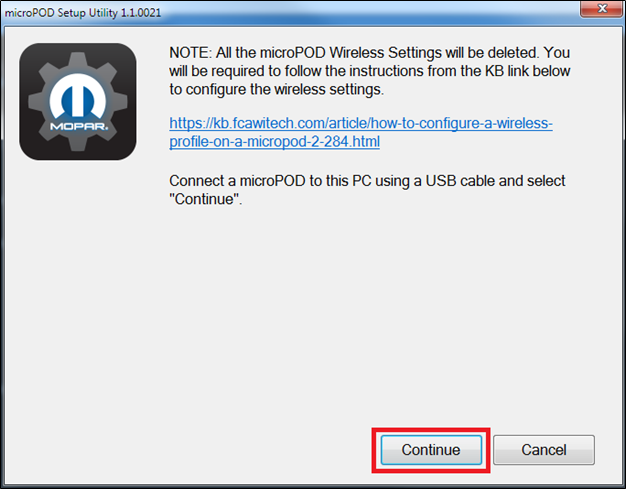
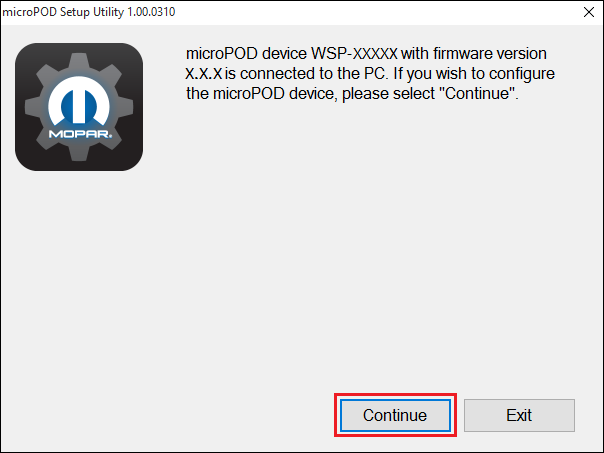
Once your microPOD II is recognized by the utility, select “Continue” to proceed with the configuration.
Steps-to-download-and-install-the-microPOD-Setup-Utility-12
NOTE: microPODs with a serial number beginning with “WFP” should NOT be used with this utility.
Step 3a
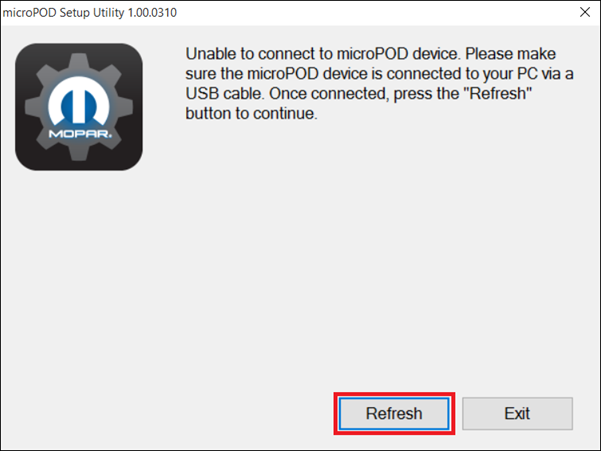
If the utility does not find the microPOD device, please assure that the microPOD is connected via USB and click “Refresh”.
Steps-to-download-and-install-the-microPOD-Setup-Utility-13
Step 5
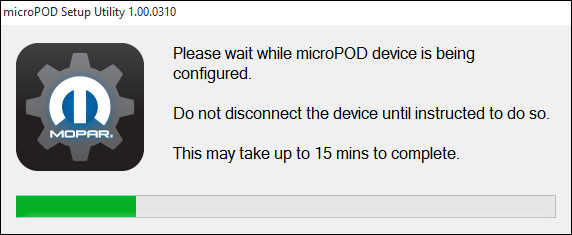
The following screen will appear for up to 15 minutes while the microPOD device is being configured.
Steps-to-download-and-install-the-microPOD-Setup-Utility-14
Step 6
The following screen will appear when the utility completed the configuration of microPOD for wiTECH 2.0 Application.
Note: After microPOD Setup Utility is ran, all existing wireless networks will be removed from the microPOD.
Important! Leave the microPod Setup Utility window running as you will be required to complete software updates to the microPod device before configuring the wireless.
Step 6a
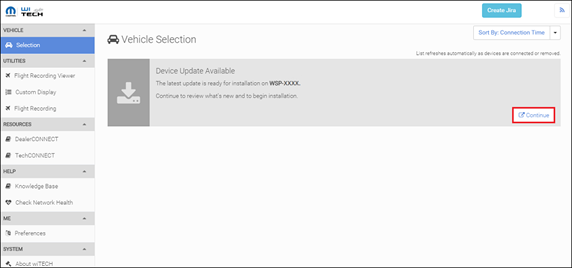
Login into wiTECH 2.0 with SID that has been assigned to the microPod at https://login.n.fcawitech.com . The microPOD II that was just configured using the microPOD Setup Utility should appear in the wiTECH 2.0 discovery. You will need to update the operating system of your microPOD II before it can be used with wiTECH 2.0. Click “Continue”, and your web browser will redirect you to the page to download and install the operating system update as seen in the following step.
Steps-to-download-and-install-the-microPOD-Setup-Utility-15
*NOTE: If microPOD II does not show up in discovery after a couple of minutes please power cycle your microPOD II by unplugging it and plugging it back in.
Step 7
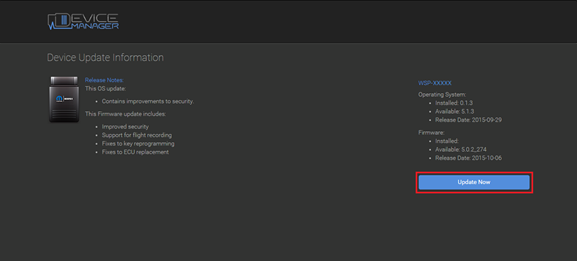
Click “Update Now” and your microPOD II should continue to the update screen. Once updating, do not interrupt your microPOD II at any point until the update is complete.
Steps-to-download-and-install-the-microPOD-Setup-Utility-16
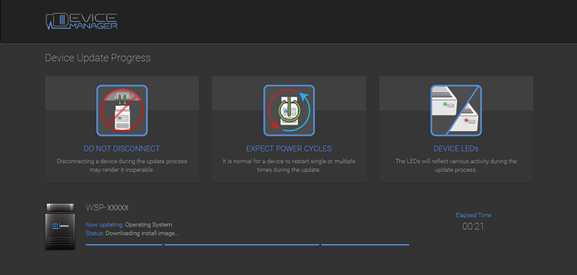
*NOTE: This can take upwards of 9 minutes. It is normal activity for the microPOD II to reboot.
Steps-to-download-and-install-the-microPOD-Setup-Utility-17
Step 8
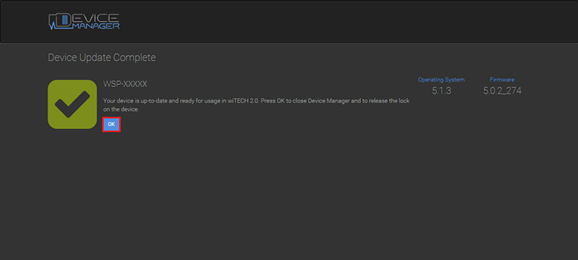
Click “OK” and you will be navigated back to the wiTECH 2.0 discovery page. Your microPOD II should appear updated and ready for use.
DO NOT UNPLUG USB cable from the pod until the WiFi is configured successfully first.
Steps-to-download-and-install-the-microPOD-Setup-Utility-18
Steps-to-download-and-install-the-microPOD-Setup-Utility-19
Step 9
With the microPod Setup Utility still running, please follow the KB link listed below to configure wireless on the microPod device.

Thursday, October 24, 2019

JeepChrysler Witech – ADVICE from Expert

Because i work with FCA diag software on a daily basis i can share some experience.
There is a standard adopted by most automakers in 2002? So just about any cheap chinese obd tool (if it supports the appropriate communications protocol) can read basic trouble codes populated on the databus. But that s all.
To dig deeper into other control units, make adjustments and programming you need more sophisticated devices
When talking about OEM tools, then for almost anything up to 2005 (some dodge trucks up to 2007) you need a DRBIII
WiTech DRB Emulator is NOT a 100% replacement for a real DRB Scan tool.
From 2007 up to 2009 you can use StarScan or StarMobile. basicaly the same device with the same capabilities. The only difference ist that Starscan is a standalone handheld unit with color LCD and Starmobile uses the VCI pod as an interface and needs a PC as a desktop client. Now obstolete, no FCA support nor flash files anymore.
Still both work pretty well in standalone mode, you can do almost anything dealer can, except flashes.
WiTech (or WiTech1) – can use the same communication interface as starmobile did. Or can use the new Micropod. Can work in standalone mode. Supports vehicles up to 2015. Again, can do just about anything the dealer can, including flashes (if you have paid access to techAuthority service). Lot of clones on the market, also same used units from closed dealerships…
BUT!!! You go online and play with FCA and do not have registered micropod or VCI pod it will be rendered locked and useless.
Todays state of art is Witech2.
This is online only solution. No standalone software or application. Works with just about any internet browser or operatiing system (win, apple, unix, linux android…..) Does not work without internet connection.
Uses the same wiTech MicroPod 2 bud you need an utility to change firmware. this can be done only once. So if you still plan to use Witech 1, you need another micropod which will be dedicated to Witech2 only.
Then you need a $$$ subscription from FCAWitech. In USA it is also available for an aftermarket shops, in Europe it is a dealer-only option.
Works also with some clones, but it is a hit/miss. Good clones whicch work run about $500 in the net. Not cheap, but still better than $1800
This is a decent micropod 2 china clone: (it’s sp271-c)
Regarding the AppCar FCA software – it works. I know who made it and have a multi license version (not single vehicle). can do a lot but not everything.
But in some cases it can go beyond the capabilities of dealer tools.
You can change gear ratios, tyre circumference/size, enable/disable TPMS, program DRL, program voltages for PWM (good for LED headlamps) and a lot of other stuff.
Quite long post, but hope someone finds this info useful
Attachment: witech abilities
wiTech
DTC Code Retrieval
Retrieve OE DTC with code Definition     X
Link DTC to service information     X
Customizable PID display     X
Retrieve and display Mode 6 Data     X
Data Logging
Body     X
Chassis     X
Electrical     X
Powertrain     X
Pressure/Vacuum Tests
Bi-Directional tests
Body     X
Chassis     X
Electrical     X
Powertrain     X
Network Tests
Network Topography     X
CAN     X
CCD BUS
SCI BUS ISO 9141
PCI BUS     X
Module Programming
Programmable Module Installation (PMI) procedures     X
Module Reprogramming (Reflash)     X
Coding     X
Supplemental restraints initialization     X
Programmable Parameters ( ability to change in service settings i.e., tire size, personality, customer convenience etc.     X
Body Controls
Anti-theft System Functions     X
Remote Keyless Entry     X
Factory Keyless Entry Code     X
Restraints (supplemental restraints and seat belts)     X
Chassis Tools
ABS Service Bleed     X
ABS/ Brake system functions     X
IVD Initialization Sequence
Ride Height Calibration ( for vehicles with pneumatic or hydraulic ride height controls)
Tire pressure monitor functions     X
Cruise Control System tests     X
Electronic Ride control     X
Electrical Tools
Charging System Tests     X
Parking Aid Tests     X
Audio     X
Powertrain Tools
EVAP Test     X
Force monitors to run
Fuel Economy Test
Fuel System Test/Relative Injector Flow Test     X
Bi-directional control of fuel components     X
Bi-directional Ignition System control     X
Power Balance Test     X
Relative Compression Test     X
Transmission bi-directional Tests     X
Engine Checks and OBD Tests (Drive Cycle, Mode 01, Mode 06 & Mode 09)     X
EGR Test     X
Digital Multimeter
Basic DMM functions
Current measurements (50 Amps/500 Amps)
Pressure/Vacuum measurements
Oscilloscope Tools
Oscilloscope
Alternator ripple
COP (Coil-On-Plug) stress test
Tuesday, October 1, 2019

How to work Chrysler wiTech Micropod 2 with DRB III Emulation?


MicroPOD II function:
  1. It can be used as diagnostic and programming tool by the dealerships. It replaces your StarMobile, StarScan, and wi-TECH POD, and enables your technicians to increase their productivity and provide world-class diagnostic services to your customers.
  2. A separate Tech Authority  Subscription is required to access to Module Re-Flash Programming, TSBs, wiring diagrams, and repair information.

Intention:
Trying to find one micropod II that would work properly with DRB Emulation. Especially with Chrysler Crossfire.

Credit to Radius from Mhhauto. You are at your risk.

Test procedure:
Test 3 different micropod interfaces. 2 devices did not work with DRB III emulation at all, no matter which vehicle. The 3rd device worked and it worked on Chrysler Crossfire – access to ALL modules.

I think the 2 devices which did not work are missing hardware for K-Line or some such.

The device verified working is an OFFLINE ONLY version of witech micropod 2, but I only use it for diagnostics, not for programming as I do not have a TechAuthority account. So if you need one for online use this is not the unit to buy.

How to get witech to work with Enhanced DRB III Emulator?
1: Make a backup copy of the partition from the hard drive included with the micropod!
2: Install HDD in laptop
3: Set date to 01/01/17 BEFORE booting from laptop
4: Boot to HDD
5: Allow windows to install drivers, etc, as needed for your laptop and reboot as needed.
6: Once all of that is done, do NOT run WiTech yet!
7: Turn OFF internet!
8: Navigate to C:\ProgramData\wiTECH\jserver\data\core\stubs
9: Install DRB Emulator stub
10: Install DRB Enhanced emulator stub
11: Install K-Line stub
12: Reboot computer
13: ALLOW internet access
14: Run Flexnet software updater. Do NOT update WiTech!!!
15: Flexnet will find updates for enhanced DRB and K-Line
16: Install K-Line update first
17: Install Enhanced update next.
18: Once updates and downloaded and installed, turn OFF internet and NEVER turn on again!
19: Reboot computer
20: Attach Micropod to car. When green LED turns on, turn on car ignition
21: Attach USB cable to PC and witech Micropod 2
22: When Windows is done installing drivers, etc, you should show a network connection in the tool tray with no internet access
23: Run Wi-Tech
24: Press “Launch DRB III” button in lower right hand corner
25: Accept EULA
26: DRB Emulator will launch.
27: Enjoy.