Sunday, December 27, 2020

Anyone know GM TECH2 and MID diagnostic tools


What is the difference between the Tech 2 hand held tool and the newer MID interface you use with a laptop? From what I read, the MID will replace the TECH2 but currently it doesn’t diagnose, just program. I need to diagnose a few issues on a 2007 Silverado, 2012 Cruze and 2013 Cruze flood car

Anyone-know-GM-TECH2-and-MID-diagnostic-tools-1 Anyone-know-GM-TECH2-and-MID-diagnostic-tools-2
Anyone-know-GM-TECH2-and-MID-diagnostic-tools-3

Anyone-know-GM-TECH2-and-MID-diagnostic-tools-4

The last update for the tech 2 has already come out so, I would think about buying a new one unless you work on a lot of GM products.

Depending on the vehicle you’re working on, the GM MDI (Multiple Diagnostic Interface) will do everything a Tech 2 will do but, you’ll need a laptop and GDS software. Going forward from the 2013 model year, the MDI with a laptop will be the GM Diagnostic tool.

General Motors (GM) has launched Global Diagnostic System 2 (GDS 2) – its next generation, PC-based vehicle diagnostic system. GDS 2 is a PC-based platform that builds on the original GDS application, but also incorporates several new features, based on technician input. Combined with a Multiple Diagnostic Interface (MDI), GDS 2 provides an exclusive, effective and efficient system for the diagnosis of all the automaker’s new Global Architecture vehicles.

Tech2 is being phazes out, the MDI as stated above will replace it fully very shortly, you can use tech2win for older vehicles, GENERALLY anything with the new style flip keys from general motors will require the MDI with GDS2 software. so those clone tech2s will be useless on both cruze’s you plan to work on. they may or may not work with the 07 silverado, depending if they have the CANDi module

Friday, December 25, 2020

2015 Toyota Reiz Car body Computer Personalization Setting by Launch X431


2015 Toyota Reiz Car body Computer Personalization Setting by Launch X431

Actual Measurement Car Model:Toyota Reiz 2015

Actual Function:

These functions has already been actually tested on Toyota.
1.Automatic padlock
2.Switch off the ignition about 30S/60S/120S Automatic padlock setting;
3 Press Remote control one time or twice to unlock setting.;
4.Luggage cover Settings;
5.The remote control shuts down all electric Windows;
6.The remote control opens all electric Windows; 7. ……

Operation Procedure

1.Select“Toyota V48.42”above or VIN identification;
2.Select 16Pin diagnostic socket(European and other area) See pic 2;

3.Select the automatic search see pic3;

4.Select after 2013.09 see pic4;

5.Actual measurement car model is no smart key,select no smart key,See pict5;

6.Read vehicle information. See pic 6;

7.Select system selection,see pic7;

8.Select car body system,see pic8;

9.Select BCM(Car Body Control System, main car body),see pic9;

10.Select special function,seepic10;

11.If select“Automatic Scan Special function”, This feature will automatically scan all options for personalized Settings for the diagnostic vehicle
If you select “all special functions”, this feature will display a warning message, The cue shows all the customization options for Toyota cars
Item, not all options are suitable for diagnostic models. See pic11;

12.Select customization,See picture 12;

13.Display customizable feature menu 1,see pic13:

14.Display customizable feature menu 2,see pic14:

15.Display customizable feature menu 3,see pic 15:

16.Display customizable feature menu 3,see pic16:


Launch X431 do ABS Bleed for BMW 5 Series 2011


2011 BMW F Chassis 5 Series F10 F11 F18 2011 ABS Brake Exhaust Bleeding using Launch X431 V+ (PRO3) / X431 V (Pro).

Select the newest BMW version.

launch-x431-2011-bmw-f-chassis-abs-bleeding-01 (2)

Select the manual select.

launch-x431-2011-bmw-f-chassis-abs-bleeding-02 (2)

Select vehicle models “5 series”.

launch-x431-2011-bmw-f-chassis-abs-bleeding-03 (2)

Select “5’_F10/F11/F18”.

launch-x431-2011-bmw-f-chassis-abs-bleeding-04 (2)

Select “Chassis”.

launch-x431-2011-bmw-f-chassis-abs-bleeding-05 (2)

Select “ABS (Anti-lock Braking System -DSC)”.

launch-x431-2011-bmw-f-chassis-abs-bleeding-06 (2)

Pay more attention to ECU Identify, select “OK”.

launch-x431-2011-bmw-f-chassis-abs-bleeding-07 (2)

Select “Special Function”.

launch-x431-2011-bmw-f-chassis-abs-bleeding-08 (2)

Select “Brake Bleeding procedure”.

Read the information to follow.

Read the preparation.

launch-x431-2011-bmw-f-chassis-abs-bleeding-09 (2)
launch-x431-2011-bmw-f-chassis-abs-bleeding-10 (2)
launch-x431-2011-bmw-f-chassis-abs-bleeding-11 (2)

Open bleeder valve at rear left wheel.

launch-x431-2011-bmw-f-chassis-abs-bleeding-12 (2)

Pre-bleeding routine for the rear-axle brake circuit.

It prompts that the rear-axle brake circuit completed.

launch-x431-2011-bmw-f-chassis-abs-bleeding-13 (2)

launch-x431-2011-bmw-f-chassis-abs-bleeding-14 (2)

Bleeding routine for the rear left wheel.

Bleeding routine at rear left finished successfully.

Read prompt: Close rear left-hand bleeder screw once the brake fluid started to emerge without bubbles and foam.

Attach bleeder bottle to front left bleeder valve and open front left bleeder screw.

launch-x431-2011-bmw-f-chassis-abs-bleeding-15 (2)
launch-x431-2011-bmw-f-chassis-abs-bleeding-16 (2)
launch-x431-2011-bmw-f-chassis-abs-bleeding-17 (2)

Pre-bleeding routine for the front-axle brake circuit starts.

Pre-bleeding routine for the front-axle brake circuit. Press the brake pedal as far as it will go every 3 seconds.

This process takes approx. 15 seconds.

Bleeding routine at front left finished successfully.

launch-x431-2011-bmw-f-chassis-abs-bleeding-18 (2)
launch-x431-2011-bmw-f-chassis-abs-bleeding-19 (2)
launch-x431-2011-bmw-f-chassis-abs-bleeding-20 (2)

Bleeding routine for the front left wheel starts.

Read the prompts and follow to do.

Bleeding routine at front left finished successfully.

launch-x431-2011-bmw-f-chassis-abs-bleeding-21 (2)
launch-x431-2011-bmw-f-chassis-abs-bleeding-22 (2)
launch-x431-2011-bmw-f-chassis-abs-bleeding-23 (2)

Bleeding routine for the front right wheel starts.

Attention to the prompt.

Finished successfully

launch-x431-2011-bmw-f-chassis-abs-bleeding-24 (2)
launch-x431-2011-bmw-f-chassis-abs-bleeding-25 (2)
launch-x431-2011-bmw-f-chassis-abs-bleeding-26 (2)

Bleeding routine for the rear right wheel starts.

Attention to the prompt.

Finished successfully

launch-x431-2011-bmw-f-chassis-abs-bleeding-27 (2)
launch-x431-2011-bmw-f-chassis-abs-bleeding-28 (2)
launch-x431-2011-bmw-f-chassis-abs-bleeding-29 (2)

Launch X431 V+ / X431 V tech support: www.obd2tool.com

Friday, November 20, 2020

BMW Models and CAS FEM IMMO Type List


Question:
Is there a page or does someone have a list where all bmw models with the corresponding ews/cas type are listed?

Answer:
Yes, here obd2tool.com provides 2000 to 2019 year BMW CAS FEM system list:

2000-2019 Year BMW CAS Systems
MODELS CAS1  912DG128(3K91D) CAS2 9S12DG256(2K79X) CAS3 9S12DG256(0L01Y) CAS3+ 9S12XDP512(0L15Y) CAS4   9S12XDP512(1L15Y) 9S12XEP100(5M48H) FEM/BDC BDC2
BMW 1 Series No 2004-2006(E87) 2007(E87) 2008-2011(E87) No 2012-2019(F20) No
BMW 2 Series No No No No No 2014-2019(F45) No
BMW 3 Series No 2005-2006(E90) 2007(E90) 2008-2012(E90) No 2013-2019(F30/F35) 2019.06-(G20)
BMW 5 Series No 2004-2006(E60) 2007(E60) 2008-2010(E60) 2010-2018(F07/F10/F11/F18) No 2018.06-(G30/G38)
BMW 6 Series No 2004-2007(E63/E64) 2008(E63/E64) 2009-2010(E63/E64) 2011-2018(F12/F13) No 2018.06-(G32)
BMW 7 Series 2001-2004(E65) 2004-2008(E66) No No 2009-2015(F01/F02) No 2016-(G12)
BMW X1 Series No No No 2010-2016(E84) No 2016-2019(F49) No
BMW X2 Series No No No No No 2017-2019(F39) No
BMW X3 Series No No No No 2011-2018(F25) No 2018.06-(G08)
BMW X4 Series No No No No 2014-2018(F26) No 2018.06-(G02)
BMW X5 Series No No 2007(E70) 2008-2013(E70) No 2014-2018(F15) 2018.06-(G05)
BMW X6 Series No No No 2008-2014(E71) No 2014-2018(F16) No
BMW X7 Series No No No No No No 2019-(G07)
Note Odometer correctionYes, via OBD or BDM, need to remove Dashboard.
Key programming:Yes, via OBD or BDM
Odometer correction:Yes, via BDM, need to remove Dashboard.
Key programming:Yes, via BDM
Odometer correction:Yes, via OBD or BDM, need to remove Dashboard.
Key programmingYes, via OBD or BDM
Odometer correction:Yes, via OBD or BDM, need to remove Dashboard.
Key programming: via OBD or BCM (CAS3+ via OBD)
Odometer correction:Yes, via BDM, need to remove Dashboard.
Key programming: Yes, via BDM. Support CAS4 till 2012.06. Does not support 2012.06- CAS+ with CPU 5m48h
Odometer Correction:Yes, reset FEM/BDC.  by FEM filter. 2 ways:

1 directly add on FEM module

2. add on the backside of the dashboard. Key programming: Yes

Odometer Correction:

Bosch dash: Add Filter and adjust mileage on chip 32128.

VDO dash: need emulator and filterKey programming: No


Top Tools to Register and Code BMW New Battery


BMW Battery Registration vs. Coding

The registration procedure clears the charging history of the old battery and tells your BMW that a new battery with the same specs as the old battery is installed. The Engine Control Unit (DME) can charge the battery properly.

*  Battery Registration
*  Registration must be performed every time you change the battery on a 2002 and newer BMW. It lets the car know the battery installed is brand new.
*  If the new battery has the same specs or very close to the old battery (CCA, CA, Ah, battery type) no coding will be required.
*  Battery Coding
*  In addition to the registration procedure, you will need to carry out coding if you change the battery capacity or type. Coding is required if the new battery has different specifications compared to the old battery installed in the car.
*  For example, if you install a battery with a higher or lower cranking Ampere rating, or switch between Lead Acid and an AGM battery, you will need to code (program) the DME. Otherwise, the DME may overcharge or undercharge the new battery, and therefore shorten the life of the battery.

Some FAQs:

Q: Why do I need to register a new battery?
A: The short answer is that BMW designed the charging system with an algorithm that varies the rate of charge by the age and type of the battery installed. Registering a new battery resets the algorithm back to optimal charging voltage for the specified battery.

The long answer: “The negative battery cable has an electronic control unit on the battery end of it called an intelligent battery sensor (IBS). The IBS measures the state of battery charge and sends this information to the ECU. The ECU uses this information to control how much charging voltage is needed from the alternator to support vehicle electricity needs. A battery deteriorates normally over time and depending upon service demands and driving profile. The IBS reads this and the ECU tells the charging system to increase voltage and amperage output incrementally as the battery matures. Therefore, at battery replacement time, if you don’t tell the ECU it has a new battery it will overcharge the new battery causing it to wear out faster.

The registration process takes place in the ECU, which is the main player in this system. Also, when the IBS sees that battery voltage is too low for normal vehicle operation it can start shutting down vehicle functions to conserve power while keeping the vehicle operational. This would be accompanied by a check control warning of excessive battery discharge.”

Q: Why do I need to “code” for a new battery?
A: The answer to this varies. You may not have to! That is, so long as you replace your old battery with an exact replacement. However, if you switch from a wet-cell type battery to an AGM type battery, or vice versa, you must code for the change.

AGM and wet-cell batteries require a different rate of charge output from the alternator. Moving between these two types without coding can lead to over-charging or under-charging.
Also, batteries have a discharge rating called amp hours (ah). You must specify to the DME what the “ah” rating of your battery is so the car can run the proper charging algorithm.

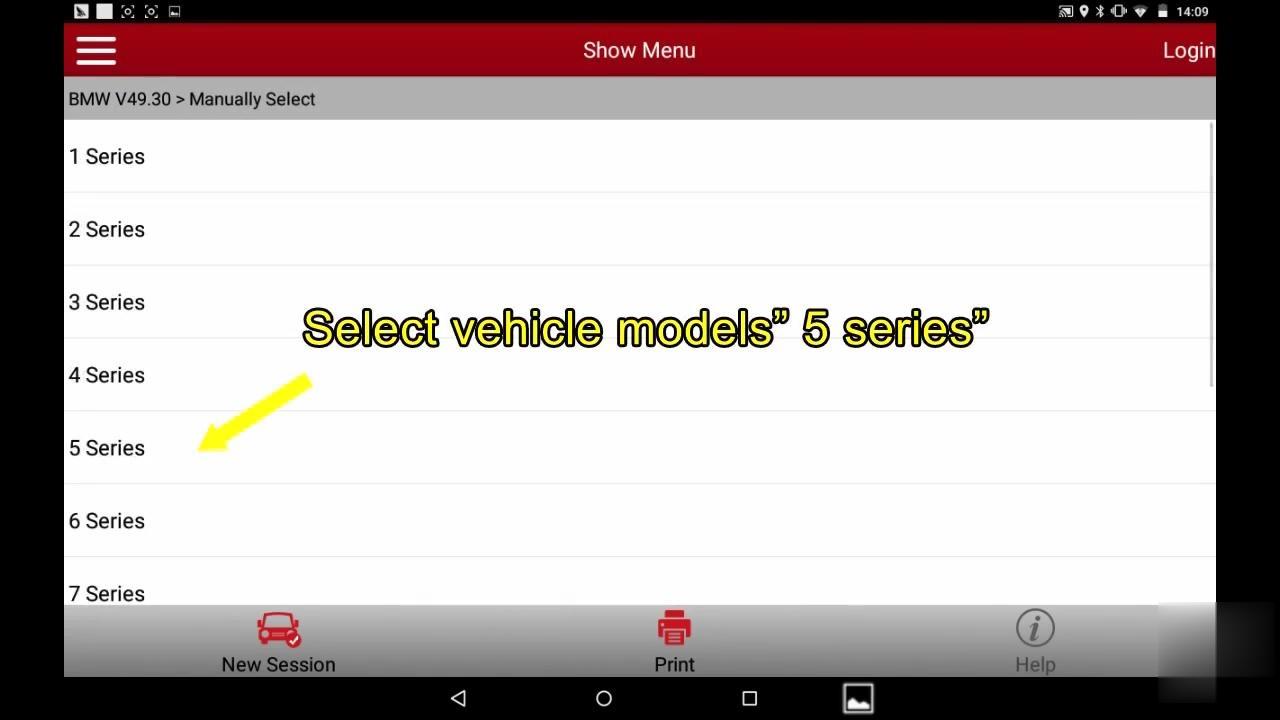
Top BMW Battery Registration Scan Tools:

To complete the BMW battery registration process yourself, you will first need an OBD2 scanner that can perform BMW battery registration. Here is a list of popular scanners that you can use to register a new BMW battery.

*  Foxwell NT510/NT520/NT530 for BMW
*  One of the most popular BMW scanners. The tool can be used to register a new BMW battery with similar specs compared to the previous battery. Installing a new battery with significantly different specs requires coding which is not currently available on Foxwell NT510 at the time of testing.
*  BMW ISTA Rheingold
*  Require a laptop, ISTA software and hardware interface (ICOM, K+DCAN, ENET cable etc).
*  Autel Scanners (MaxiSys, TS608, MD808 Pro etc)
*  Professional Level Diagnostic Scanner. It can be used to program and code any type of battery including AGM and lead-acid, even if the replacement battery is significantly different than the original.
*  BMW INPA Software (INPA K+CAN)
*  Require a laptop and familiarity with INAP software. One of the cheapest scan tools able to register a BMW battery.
*  Carly App for BMW

The procedure to register a BMW battery is very similar to most of the scanners out on the market.

Saturday, November 14, 2020

Easy To Bleed ABS Brake Systems By GM Tech2 Scanner


Both cars and trucks have ABS systems or anti-lock braking systems that require regular maintenance. This GM Tech2 scanner is specially designed for GM vehicle models.

We will talk about how to bleed the ABS system with Tech 2 Scanner.

gm-abs-system

instructions:
1) Raise your car into a properly support position
2) Disassemble all 4 tires and wheel assemblies
3) Check the brake system for leaks and visual damage. If the situation is damage or have to be get it done and how to use the device to make a possible position. Replace or repair as needed.
4) Check the battery state of charge (you may refer here )
5) Install GM Tech2 scan tool software. (Download related PDF manual on OBD2TOOL webpage)
6) Turn the ignition to ON position with the engine OFF
7) Connect the GM Tech2 scanner into the OBD diagnostic socket
8) Select “Special Functions”>> “Automated Bleed”
9) Bleed the base brake system.
10) Follow the Tech2 scanner screen instructions until the desired brake pedal height is achieved.

NOTE:
If the bleed procedure fails, do as following:
If a DTC is detected, select “Diagnostic Trouble Code” to clear DTCs. If the brake pedal eels spongy, repeat the conventional brake bleed procedure again.

11) When the desired brake pedal height is achieved, press the brake pedal to check the firmness.
12) Unplug the GM Tech2 scanner from the OBD socket
13) Install the 4 tires and wheel assemblies
14) Check the brake fluid level and the firmness of pedal again