Sunday, May 31, 2020

How to diagnose and fix a Mercedes-Benz by Launch ThinkDiag OBD2 scanner

How to diagnose and fix a Mercedes-Benz by Launch ThinkDiag OBD2 scanner
Car: 2013 Mercedes-Benz GLK 350 Class
How-to-diagnose-and-fix-a-Mercedes-Benz-by-Launch-ThinkDiag-1
Device: ThinkDiag full-system OBD2 diagnostic tool
How-to-diagnose-and-fix-a-Mercedes-Benz-by-Launch-ThinkDiag-2
Guide& Tips to diagnose and fix Benz:
Plug the ThinkDiag device into OBDII port in the vehicle
How-to-diagnose-and-fix-a-Mercedes-Benz-by-Launch-ThinkDiag-3
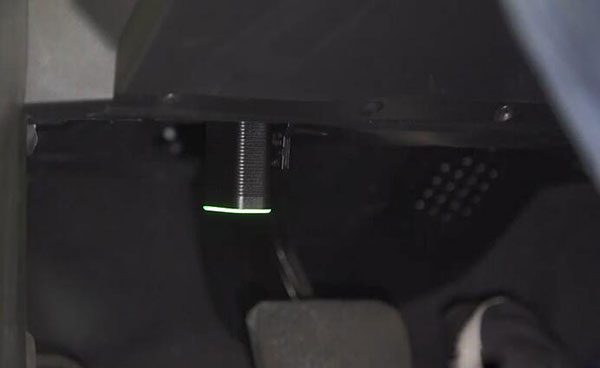
Note: When you hear the beep and see the green light in the device, that indicates the device is connected correctly.
Have the key on the position
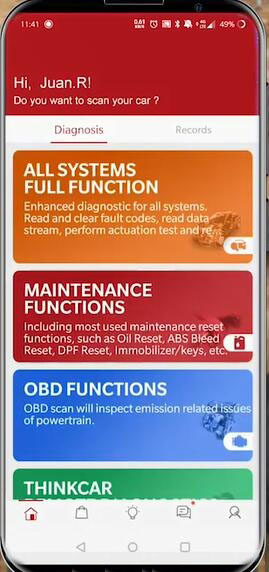
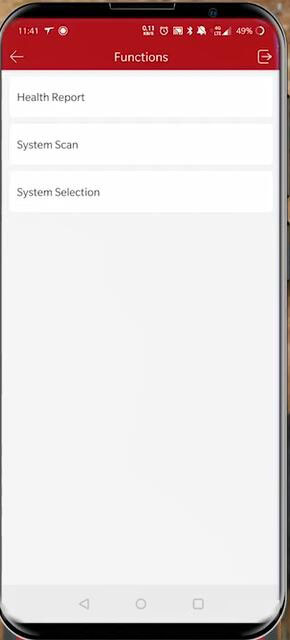
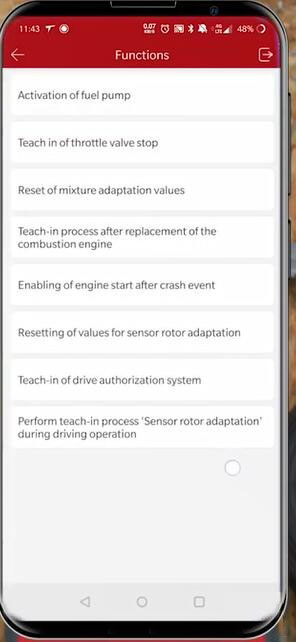
Here show a few functions that can do here.
There are two ways to get into the APP
Method 1: Go to ThinkStore and select the car software
How-to-diagnose-and-fix-a-Mercedes-Benz-by-Launch-ThinkDiag-4
How-to-diagnose-and-fix-a-Mercedes-Benz-by-Launch-ThinkDiag-05
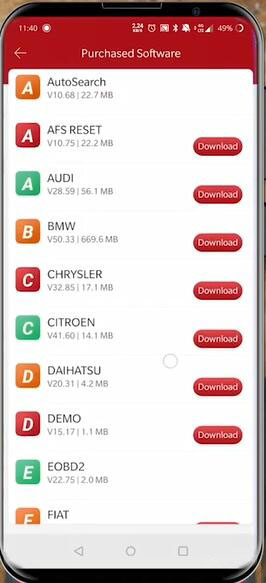
Note: If you don’t have downloaded, you would select download. Otherwise, just select the software you want.
Method 2: Select “All Systems Full Functions”
How-to-diagnose-and-fix-a-Mercedes-Benz-by-Launch-ThinkDiag-5
It will automatically scan the vehicles
Here is the vehicle info found incl. car make, model, year and the VIN number at the bottom
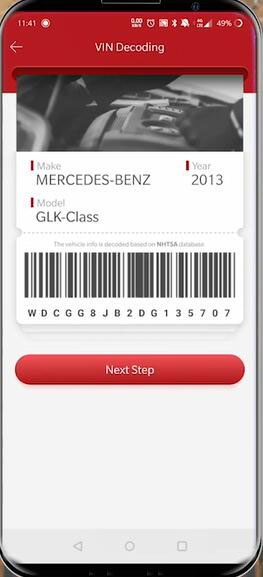
How-to-diagnose-and-fix-a-Mercedes-Benz-by-Launch-ThinkDiag-6
Select “Next step”
The vehicle VINCODE will appear on the screen
How-to-diagnose-and-fix-a-Mercedes-Benz-by-Launch-ThinkDiag-7
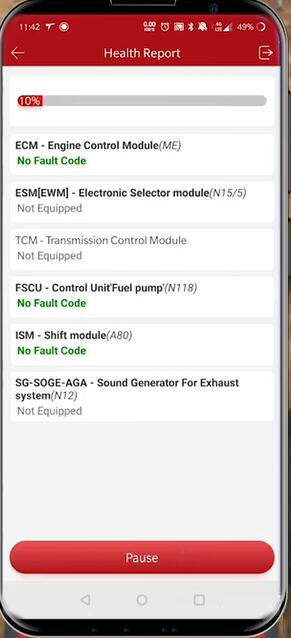
After got the vehicle information, select “Health Report”
How-to-diagnose-and-fix-a-Mercedes-Benz-by-Launch-ThinkDiag-8
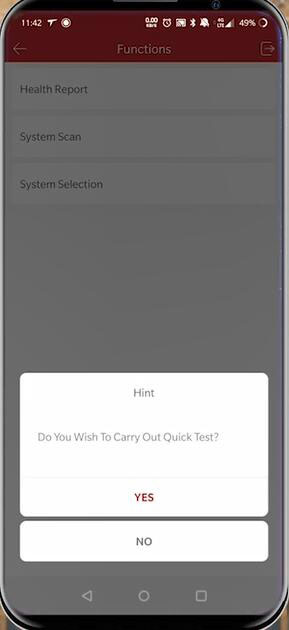
When it asks “Do you wish to carry out quick test?”, click “YES” to continue
How-to-diagnose-and-fix-a-Mercedes-Benz-by-Launch-ThinkDiag-9
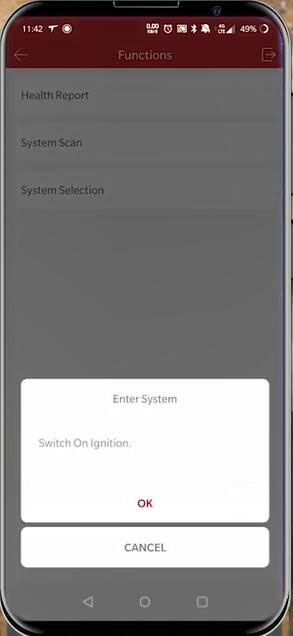
It will enter system, and then switch on ignition
How-to-diagnose-and-fix-a-Mercedes-Benz-by-Launch-ThinkDiag-10
Start to scan the vehicle to check if there is any issue with any of the electronic components
Scanning each module
If the module that you want to test before the scan is finished, you can press the pause function that will stop the skin and give you the information
How-to-diagnose-and-fix-a-Mercedes-Benz-by-Launch-ThinkDiag-11
Then it will have the option to read the fault codes
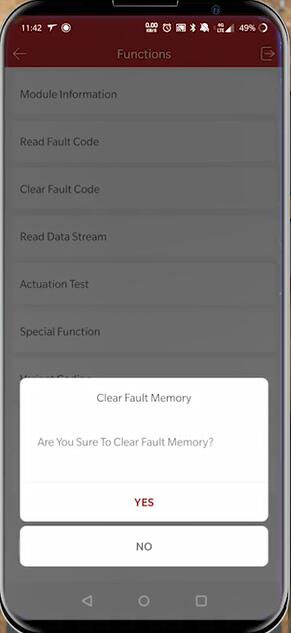
Just click “Clear Fault Code” to erase all the errors
How-to-diagnose-and-fix-a-Mercedes-Benz-by-Launch-ThinkDiag-12
How-to-diagnose-and-fix-a-Mercedes-Benz-by-Launch-ThinkDiag-013
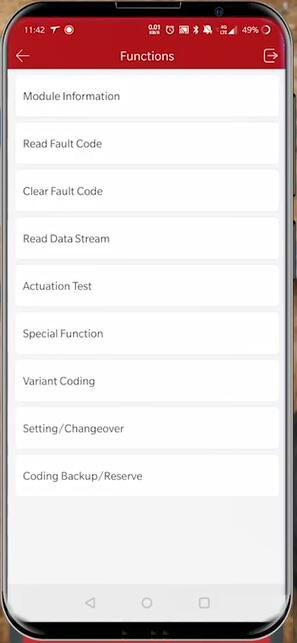
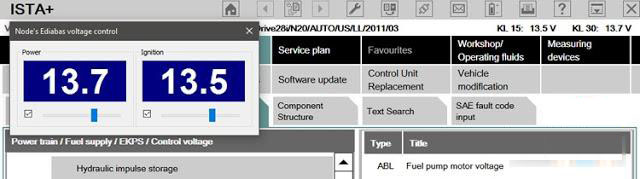
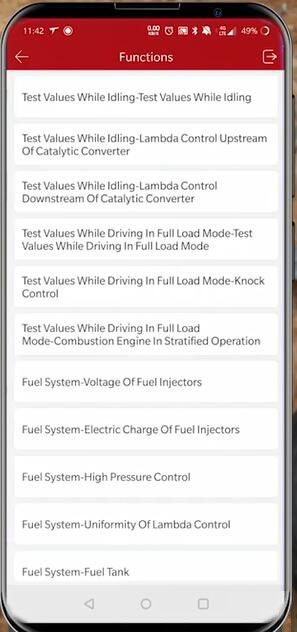
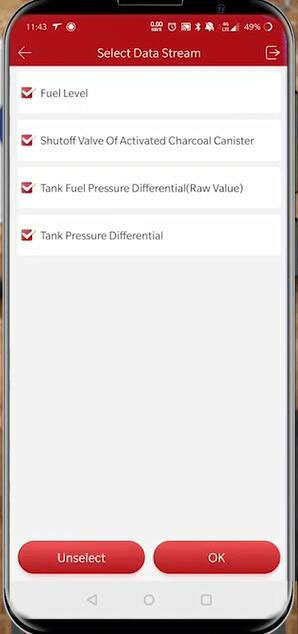
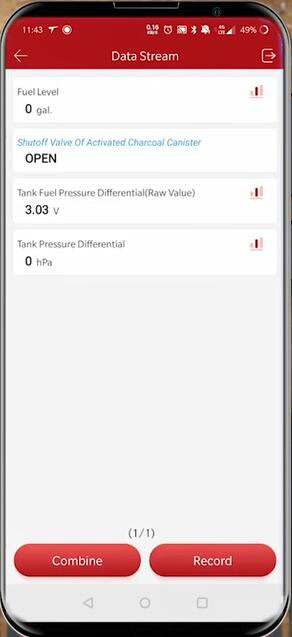
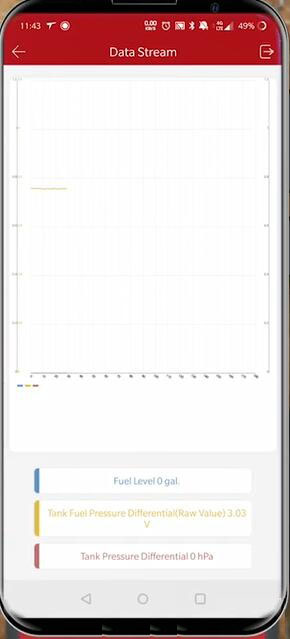
If you want to see the live data, select “Read Data Stream”
Then choose the option you need combine
How-to-diagnose-and-fix-a-Mercedes-Benz-by-Launch-ThinkDiag-013-1
How-to-diagnose-and-fix-a-Mercedes-Benz-by-Launch-ThinkDiag-13
How-to-diagnose-and-fix-a-Mercedes-Benz-by-Launch-ThinkDiag-014
How-to-diagnose-and-fix-a-Mercedes-Benz-by-Launch-ThinkDiag-14
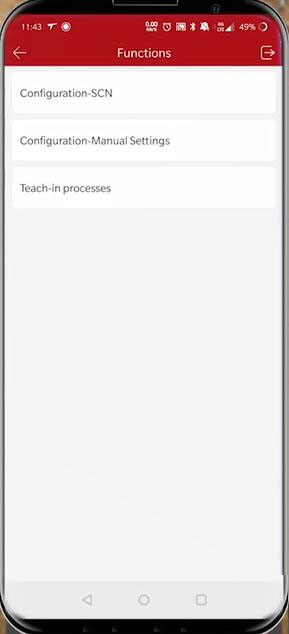
Finally, you can use the “Teach-in process” and activate the fuel pump to do different special functions.
How-to-diagnose-and-fix-a-Mercedes-Benz-by-Launch-ThinkDiag-015
How-to-diagnose-and-fix-a-Mercedes-Benz-by-Launch-ThinkDiag-15
Want to know more about Launch X431 Scan Tool, please visit our website.

GM MDI vs VCX Nano GM diagnostic cable

What’s the difference among GM MDI, VCX Nano GM cable & Tech 2, other than price, and what’s the similarity?
@ Dcasole review:
None the MDI and the nano are just pass tru devices used to communicate with the car when using TECH II WIN
Make sure the VCX nano comes with software otherwise you will have to buy a license
I have one and use the GDS2 software for my C7 and the Tech II win for all my buddies C6 …came with hacked software that runs in a VM machine.
Mine came on a CD, I know why they offer it on a hard drive
The software can be a challenge to load if you don’t know what you are doing
Tech II win and GDS2 was built to run on a 32 bit Windows 7 machine
I was able to get TECH ll Win to run on my Windows 10 64 bit machine but it’s a crapshoot, some can’t get it to run on Windows 10
I never got GDS2 to run in windows 10
There are not many of those old laptops around that have enough power to run the software so they give you a copy of VM ware ( virtual machine) and a copy of Windows 7 with all the software loaded so when you start the VM session, Windows 7 starts inside this shell and then you click on GDS2 for later cars or TECH II WIN for earlier models
So not to many people know how to load and run VM ware that is why they just copied all the software to a hard drive for you and then you just make a shortcut to your windows 10 desktop
Now its still not all plug and play as you need to allow VM ware Access to your USB ports etc which is not hard to do
You also need good hardware as VM ware uses a lot of resources
I tried it on an old Core Duo laptop and it was just to slow and crashed a lot
I bought an old Dell laptop Icore 5 with 16 gig of memory running Windows 10 and it runs the VM machine great
I bought my NANO from obd2tool.com figuring if I could not get it to run I would just send it back. After about a week of messing with it I now have it running both flawlessly, stick with the USB version as the wireless version is just one more thing to complicate the install. The cable is not bad to use at all
VXDIAG VCX Nano GDS2 and Tech2Win…
So for $129 for the device and another $130 for the cheap laptop ……no trips to the dealer for me or my buddies …I love it
@ Dcasole review:
The Tech II win running with vxdiag nano is the same exact software as what is on your Tech II hand held unit.
I had a Tech II knockoff but sold it when I got my C7. I was spoiled so now I wanted a GM MDI pass thru so I could work on my C7. That’s when I decided to try the VX NANO .. Works great now that I got it running and having TECH II WIN is a bonus…
There is no better tool than a TECH II or GDS for diagnosing issues or accessing modules.
@ wjnjr review:
I agree. And with the prices now you can get a Tech2 or a VCX Nano & laptop setup for the same or less $$$ than the better 3rd party scan tools which won’t do as much.

Monday, May 4, 2020

Free Download ISTA+ Voltage Control V3

Hi guys,
Node made a small utility suite which allows manual control of voltages which Ediabas sees from the interface such as OBD or CAN. It also includes additional ISTA+ support so it should work with ISTA as well. It’s not dependent on INPA or ISTA versions and should work with any version of INPA, ISTA+ and others as well as it integrates between ediabas and cable driver and is completely transparent to high level software. Additional support for ISTA+ should work with any modern version as long as internal code will not change much. My aim is to make it so all ABLs and other procedures work flawlessly.
The link:
V2:
https://mega.nz/#!AF4TSJqI!NKyh6SWwFIL5eVKd_rSCKYN0NtOO_Br4HyTT0T3yv30
V3:
https://mega.nz/#F!9QQR0YTD!Ex7SqBpwim8_UXb_Z3OkdQ
Installation instructions:1. Go to Ediabas folder. For INPA its normally C:\Ediabas\Bin, for ISTA+ its in Ediabas\Bin folder with ISTA+ directory.
1. If you are using STD:OBD rename existing obd32.dll to obd32.ebas.dll. Users of other cable types rename respective dll (for example STD:CAN users rename can32.dll to can32.ebas.dll).
2. Extract the downloaded file.
3. Copy included obd32.dll to Ediabas\Bin. For other cable types rename it to respective name first (for example can32.dll).
4. For ISTA+ only: copy included NodeISTAVoltageControl.dll to Ediabas\Bin folder within ISTA+ installation.
5. For ISTA+ v4.05 (and above) only:
a) replace existing IstaOperation.exe within ISTA+’s TesterGUI\Bin\Release folder by included one (from respective folder based on ISTA+ version).
b) run included AllowFakeISTAOperation.reg file (choose x86 or x64 depending on your system being 32 or 64 bit respectively).
To manually control the voltage start included NodeEdiabasVoltageControl.exe application. This application can be placed in a different folder if wanted. Voltage can be adjusted by moving sliders or switched off using check boxes. Unchecking check box has the same effect as moving slider to 0V.
New features:
UPDATE V2.0:Version 2.0 of this tool has been released.
New features:
1. It now checks the actual interface type setting in ISTA during runtime, so if you switch from Ediabas to ICOM it will stop interfering and resume operation as soon as interface type is set back to Ediabas.
2. It now supports K+DCAN cables which have an ability to detect clamp states (probably most higher quality cables). To use this feature control application should be closed. It will then read actual clamp states and update ISTA voltage states accordingly without any manual actions required. Starting control application will switch the operation to manual control. Closing it will resume automatic recognition.
UPDATE V3.0:Version 3.0 of this tool has been released.
New features:
1. Control application can now be minimized.
2. Support for ISTA+ v4.05 (and hopefully above).
System requirements:
Visual Studio 2015 x86 runtime must be installed (same as required for last versions of ISTA+).
P.S. This voltage control utility is not designed to and will not influence voltages reported by ICOM.
P.P.S. This utility works without any issues with original ISTA+, standalone not necessary.
Test report:
Tested with K+DCAN on ISTA+ 4.03.31, screenshot attached, works great.
KDCAN-ISTA
Thanks Node.
loading..

Possible to use Older ISTA-D with new DB2.40

Is it possible to use an Older ISTA-D for example 4.15 with an newer DB 4.20 ?
its possible, you have to make a new key in registry:
[HKEY_LOCAL_MACHINE\SOFTWARE\WOW6432Node\BMWGroup\ISPI\Rheingold]
“BMW.Rheingold.Database.CheckAppVersion.Enabled”=”False”
and change product version in registry from your installed new standalone ICOM A2 ista:
[HKEY_LOCAL_MACHINE\SOFTWARE\WOW6432Node\BMWGroup\ISPI\ISTA]
“ProductVersion”=”4.15.16.17369″
loading..