Sunday, August 30, 2020

How to Perform ECM Flash on Perkins 404F-22T Engine with Perkins EST Interface Diagnostic Tool


Perkins diagnostic adapter features:

Perkins EST is comprised of a hardware and software PERKINS EST Diagnostic Adapter . EST is comprised of a hardware and software EST is comprised of a hardware and software interface kit, which a user can use to communicate with Perkins 2300/2800 electronic engines (FG Wilson 300 750 KVA range) and FG Wilson Powerwizard control panels. This communication is established via a J1939 data link. All in all, the EST interface kit provides the user with an effective tool in diagnosing engine problems and the ability of configuring system parameters.


Procedures:

Connect Perkins EST interface to ECM and then run Perkins EST diagnostic software

After communication build,click “Service”–>”Copy Configuration”–>”ECM Replacement”

Load the data from ECM,and save the data on your PC

Click “Save to File”

Now we go to Flash window,click “Load Product Flash File”,then select flash file.(Go to Perkins.com official to download or Perkins Engine ECM Flash Collection )

After then it will show you

“The selected file is compatible with the following detected ECM(s).Please select the ECM and compatible flash file that you want to flash”

Click “OK”

Click “Begin Flash”

Wait flash process

Flash Completed Successfully!

How to Repair BMW X5 F15 Water Leaking from Headliner


BMW X5 during and/or after heavy or prolonged rain, one or both of the situation(s) listed below may occur:

* Water leaks from various locations in the headliner.
* The footwell carpet is wet or soaked with water.

More repair cases about BMW,please check here:BMW Trouble Repair

CAUSE

Multiple root causes have been linked to this issue. One or more of the cause listed below may apply.

The sunroof drain tube is:

* Not properly connected to the sunroof
* Twisted or kinked between the sunroof and where it exits the vehicle
* The sunroof drain is cut or torn above the headliner.

CORRECTION

Identify the root cause and perform the related repair on the sunroof drain tube, as outlined in the procedure.

PROCEDURE

Refer to the attachment section in this bulletin, below.

PARTS INFORMATION

Note: Depending on the root cause, some parts needed to complete the repairs must be sourced from your local hardware store (Lowes, Home Depot, etc.).

Part Number Description Quantity

61 13 6 933 305 Corrugated plastic tube As needed

83 19 0 153 321 Butyl tape As needed

For BMW part number,maybe you need BMW ETK to check.

Saturday, August 22, 2020

Piwis 2 For Porsche Scanner Diagnostic Application Guide


Piwis 2 for Porsche Scan Tool with V18.150.500 Piwis Tester 2 diagnostic software support diagnostic for Porsche till 2017. How to use the Piwis Tester II for Porsche diagnostic function?

Obd2tool.com Share Piwis Tester 2 Diagnostic Application Guide as follows:

Selecting Piwis 2 Basic Application Mode and Defining Other Settings:

1. First set the corresponding basic application mode (Standard mode, View mode, Simulation mode) as well as all other parameters by means of the control application.

Selecting the model range:

First, you must select a valid model range. This is selected in the PORSCHE basic system before starting the diagnostic application. After starting the Piwis 2 basic system, you can select the corresponding vehicle model ranges under the menu item Diagnosis. The diagnostic application is then started with the data of the selected model range.

Please refer to the corresponding documentation for information on operating the PORSCHE basic system. The following steps describe the basis procedure.

Piwis-2-For-Porsche-Scanner-Diagnostic-Application-Guide-2

2. Secondly, we can start the basic system. The general interface is displayed where you can make basic settings.

3. Select the corresponding model range under the menu item Diagnosis. As an example, the Cayenne model range was selected here:

Piwis-2-For-Porsche-Scanner-Diagnostic-Application-Guide-1

4. Application start with the data valid for this model range r selection of the model range,.

Piwis II diagnostic application can be continue to do Piwis tester 2 for Porsche scan tool diagnosis detail.

Customer need purchase the Piwis 2 Porsche Diagnostic Software V18.150.500 Porsche Piwis II Porsche Scanners just contact us freely.

Porsche PSE Retrofit Coding with PIWIS Tester

The coding procedure can be applied to All Porsche Models.

Diagnostic system required: Porsche Piwis ii, PIWIS Tester III

PSE retrofit coding is done as follows:

The sports exhaust system button can only be coded on the right-hand side of the switch console.
Code keypad assignment.

REPLACING SWITCH CONSOLE (ALL MODELS) > ENABLING SPORT/SPORT PLUS/SPORT CHRONO PLUS FUNCTION
Information
On vehicles with the equipment variant SPORT/SPORT Plus/Sport Chrono Plus, a function enable process must be carried out after replacing the switch console.
1. Determine function enabling code in PIWIS.
2. Connect the Porsche PIWIS Tester to the vehicle and start the System Tester. Switch on ignition.
3. Select the vehicle type and start the PIDT.
4. Select Air conditioning control unit using the cursor keys and press [F12].
5. Select Drive links/checks .
6. Select Function enable using the cursor keys and press [F12].
7. Enter the function enabling code and save it by pressing [F8].?
REPLACING SWITCH CONSOLE (ALL MODELS) > ENABLING SPORT/SPORT PLUS/SPORT CHRONO PLUS FUNCTION > CODING KEYPAD
ASSIGNMENT
1.Connect the Porsche PIWIS 3 to the vehicle and start the System Tester. Switch on ignition.
2. Select the vehicle type and start the PIDT.
3. Select Air conditioning control unit using the cursor keys and press [F12].
4. Select Codings/adaptations .
5. Select Customer-specific settings using the cursor keys and press [F12].
6. Select Keypad assignment and press [F12].
7. Check the button assignment using the switch console.?
7.1. Select function of the switches from the shortcut menu if necessary.?
8. Press [F8] to save the button assignment.
9. The message Data has been written appears on the Tester screen. Press [F12] to exit.
10. Read out the fault memory and erase it if necessary.
11. Check the function of the switch console during a test drive.?
Maintenance of vehicle data

Select Additional menu by pressing F7 .?
Select the Maintenance of vehicle data function. Press F12 until M numbers? appears in the Value group column.?
Select 176 – Sports exhaust system in the Coding value column. When you? touch the Installed cell, a tick appears.?
Save the values by pressing F8 . Wait until the message Modified values have? been buffered appears.?
Press F12 until F8 can be activated.?
Press F8 to write values. Wait until the message Generation of vehicle data is? complete appears.?
Press F12 to switch to Log management. Open the log by pressing F10 and? check that vehicle equipment 176 Sports exhaust system is displayed.?
Adapt coding

Press F11 to return to the list of control units.?
Select all control units.?
Switch to the Codings/adaptations menu.?
Select Automatic coding. Press F12 to continue. Wait until the message Coding has been completed successfully appears. Press F12 to continue.?
Once coding is complete, read out the fault memories of all systems, work through any existing faults and erase the fault memories.

Tuesday, August 11, 2020

Factory Passwords on Caterpillar ET Software


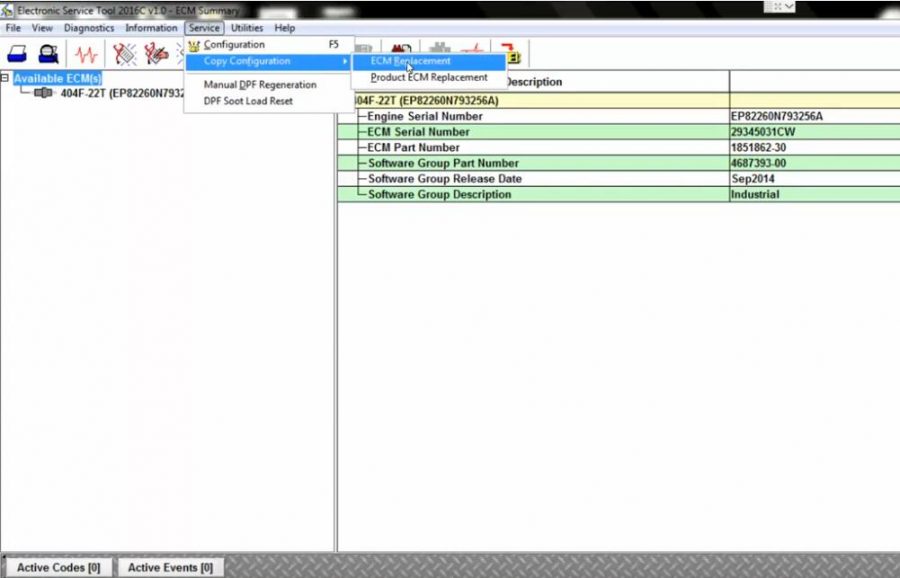
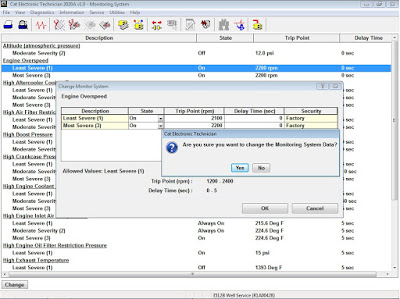
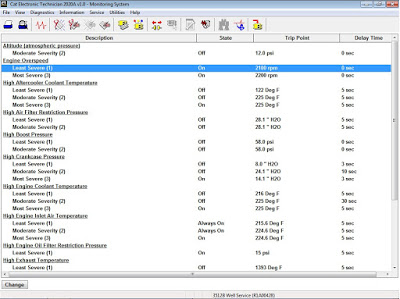
Programming Parameter
CAT Caterpillar ET Diagnostic Tool can be used to view certain parameters that can affect the operation of the engine. The Cat ET can also be used to change certain parameters. The parameters are stored in the ECM. Some of the parameters are protected from unauthorized changes by passwords. Parameters that can be changed have a tattletale number. The tattletale number shows if a parameter has been changed.

Always document the parameters and the settings that are programmed into the engine control. A permanent record is essential when customer programmable parameters must be recovered.

Factory-Passwords-on-Caterpillar-ET-Software-1

Passwords
Passwords are part of a security system that helps to prevent unauthorized reprogramming of certain parameters. Passwords prevent unauthorized erasing of logged events. Passwords allow the factory to control access to engine calibration parameters. Passwords allow the customer to control access to certain programmable engine parameters.

Customer Passwords
Customer Passwords allow the customer to restrict access to parameters that are programmable by the customer. The Customer Passwords cannot be longer than eight characters. The customer has the option of entering one or two Customer Passwords.

Factory-Passwords-on-Caterpillar-ET-Software-2

Note: If the owner loses the owner Customer Passwords, the owner will not be able to program parameters that are protected by Customer Passwords. Customer Passwords can be read if a factory password is obtained. Use those customer passwords to program parameters that have been protected by the Customer Passwords. But usually, you can directly edit the parameter as range value (Security: Customer).

Factory Passwords
Factory Passwords are required to clear any event code. Factory Passwords are required to change certain parameters such as full load setting (FLS). The Factory Passwords restrict changes to authorized personnel. When the correct Factory Passwords have been entered, the changes can then be made. In order to obtain the proper Factory Passwords, certain information must be given to an authorized Caterpillar dealer. Since the Factory Passwords contain alphabetic 
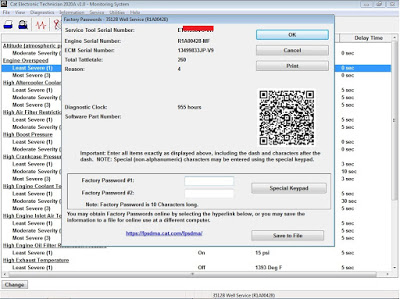
characters, Cat ET can be used to perform this function. In order to obtain the Factory Passwords, proceed as if you already have the Factory 
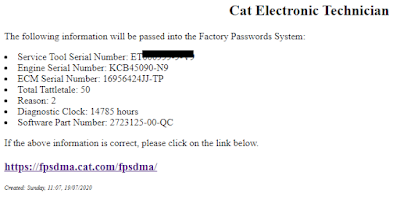
Passwords. If the Factory Passwords are needed, Cat ET will request the Factory Passwords. Cat ET will display the information that is required to obtain the Factory Passwords (as Figure 1.1 above).

Factory-Passwords-on-Caterpillar-ET-Software-3

Note: The old interlock code is required to change the interlock code on a used ECM. A new interlock code is also required to change the interlock code on a used ECM.

The Cat ET screen for factory passwords will display the following parameters:

Serial Number of the ECM
Engine Serial Number
Serial Number for Cat ET
Reason Code
Total Tattletale Number
Monitoring System (Software Dependent)

Note: The factory passwords may only be used for one programming session. A different set of factory passwords will be required after you exit the Cat ET screen. A different set of passwords will be required to change information on another Cat ET screen.

Factory-Passwords-on-Caterpillar-ET-Software-4
Factory-Passwords-on-Caterpillar-ET-Software-5
Factory-Passwords-on-Caterpillar-ET-Software-6

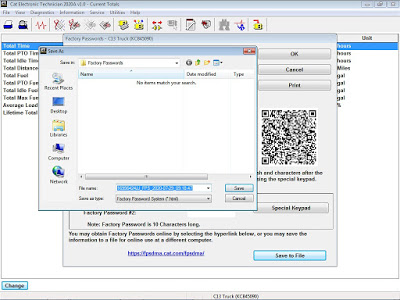
Feel FREE to Contact Us, if the Factory Passwords are needed (All Cat ET version).
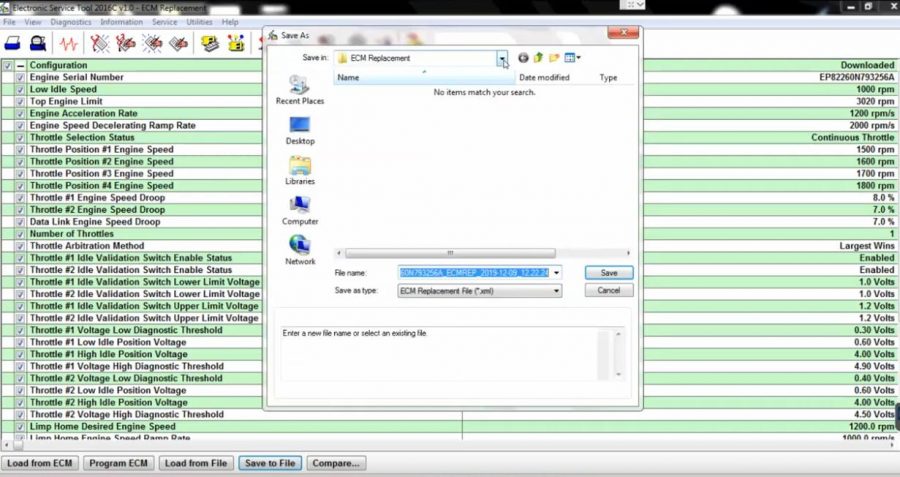
Click on “Save to File” button, then send your “html” file to my e-mail (for 10 digits Factory Passwords only).

Factory-Passwords-on-Caterpillar-ET-Software-7
Factory-Passwords-on-Caterpillar-ET-Software-8

Note: Changing the parameters that are protected by Factory Passwords may cause your Caterpillar warranty to be voided.

Caterpillar Electronic Technician (Cat ET 2020A) + Factory Password


Caterpillar Electronic Technician (Cat ET) is a Dealer Factory diagnostic software required to communicate, diagnose, and service electronically controlled Caterpillar engines and machines when connected to an Electronic Control Module (ECM). It is possible to diagnose current and potential problems, product formation, and obtain data for analysis using this software.

This software works with the dealer diagnostic scanner Caterpillar Communication Adapter as well as other adapters for diagnostics, including scanner NEXIQ.

CAT ET 2020 Full-Service Dealer features:

* Displays parameter status
* Displays active diagnostics
* Clear and View logged diagnostics
* Performs Diagnostic tests
* Print reports and diagnostic results
* Perform calibrations
* Displays current totals information i.e. fuel consumption, operating hours, etc.
* Uploads new software (Flash Files) to ECM’s
* Integration to help files
* Creates engine warranty reports
* And more capabilities & features …

Licenses, subscriptions types available in this build:

Flash Technician Full Service
Flash Technician Factory
Flash Technician Internal
NEXG5044 No Charge Cat ET
Caterpillar Product Data Transfer Utility
EERE3501 Licensed Military Cat ET
NEXG5076 Dealer Cat ET for Customer
MULT2129 Multi-Tool Full Service Dealer ET
Flash Technician Supplier
Flash Technician Flash Developer
EMDI0001 EMD Customer
CMIL3500 Cat ET for Canada Military
JERD2142 Machines
JERD2129 Full Service Dealer ET
NEXG5006 Factory
JERD2141 Commercial Engines
NEXG5000 Tech School
JERD2125 On-Highway Truck ET
JERD2128 All Engines Combined (Truck and Commercial)
NEXG5050 Cat ET AGCO Subscription
EERE2001 Flash Factory Build
NEXG5009 On-Highway Truck Customer ET
NEXG5010 Ryder ET
NEXG5007 Full-Service Customer ET
NEXG5008 Internal
NEXG5035 Premium ET
EERE2001 Comet Factory Build

2020 PC Requirements

Region: All Regions
Languages: English, Chinese, Danish, French, German, Italian, Portuguese, Spanish
Operating System OS : Windows 10 , 8.1 8, 7,  32 bit (x86) &  64 bit (x64)
Download size 518 MB
Date of update: 03/2020

Note:

installation and activate this software only by TeamViewer
Factory Password Generator is included in this Build working with all Caterpillar ECMs from 1997 to 2020 “type 10 digits”

Caterpillar-SIS-CAT-SIS-202001-Download-or-Purchase-on-USB-HDD-1 (2)

Caterpillar-SIS-CAT-SIS-202001-Download-or-Purchase-on-USB-HDD-2 (2)

Caterpillar-SIS-CAT-SIS-202001-Download-or-Purchase-on-USB-HDD-3 (2)

Caterpillar-SIS-CAT-SIS-202001-Download-or-Purchase-on-USB-HDD-4 (2)

Caterpillar-SIS-CAT-SIS-202001-Download-or-Purchase-on-USB-HDD-5 (2)

Caterpillar-SIS-CAT-SIS-202001-Download-or-Purchase-on-USB-HDD-6 (2)

Caterpillar-SIS-CAT-SIS-202001-Download-or-Purchase-on-USB-HDD-7 (2)


Tuesday, August 4, 2020

OBDSTAR X300 DP Plus Clone BCM for Opel 2011 Insignia

One of the main reasons I bought the OBDSTAR X300 DP PLUS PAD2 (C package) was to do the Opel 2011 Insignia BCM clone the same as in the video.

OBDSTAR-X300-DP-Plus-Clone-BCM-for-Opel-2011-Insignia-1 OBDSTAR-X300-DP-Plus-Clone-BCM-for-Opel-2011-Insignia-5 OBDSTAR-X300-DP-Plus-Clone-BCM-for-Opel-2011-Insignia-2 OBDSTAR-X300-DP-Plus-Clone-BCM-for-Opel-2011-Insignia-3
OBDSTAR-X300-DP-Plus-Clone-BCM-for-Opel-2011-Insignia-4 OBDSTAR-X300-DP-Plus-Clone-BCM-for-Opel-2011-Insignia-6 OBDSTAR-X300-DP-Plus-Clone-BCM-for-Opel-2011-Insignia-7 OBDSTAR-X300-DP-Plus-Clone-BCM-for-Opel-2011-Insignia-8 OBDSTAR-X300-DP-Plus-Clone-BCM-for-Opel-2011-Insignia-9

So successfully done this today!
leave module connected in car, battery charger on the battery and ignition off.
Plug into obd port
Read eeprom
Read flash
Swap bcm
Write eeprom
Write flash
Also needs internet connection to do it.